Roof repair involves fixing a damaged area of a roof. It is typically less costly than a full replacement.
Many homeowners wonder if they need to have their roofs re-roofed after a storm with significant damage. The answer depends on several factors.
A new or fairly new roof that shows a few dents and some loss of granules may only need repair.
After a storm, it’s important to assess the damage to your roof. This can help you determine whether your roof needs emergency repairs or can wait for a routine repair. A thorough inspection may also help you understand how your insurance company works with homeowners to cover the cost of roofing storm damage.
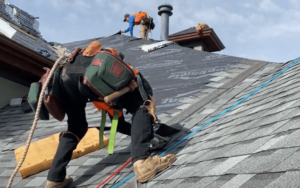
First, look for any signs of shingle damage on the ground. Wind damage may be obvious as it causes shingles to flap and become separated from each other. It can also cause shingles to lose their asphalt coating, leaving them vulnerable to further weathering and moisture ingress. Hail damage is also fairly easy to see. If the hail is large, it can leave dents in metal downspouts or outdoor HVAC units. However, if the hail is smaller, it can be more difficult to spot from the ground. You can try to look for dents in the attic or on living space ceilings, but you should always have a professional inspect your roof after any major storms.
In addition to shingles, you should also look for damage to your roof flashing, which is the strip of tar or caulking that seals between your roof and the rest of your house. If the flashing is damaged, water can leak into your home, potentially causing extensive damage to the structure and interior finishes.
Another common problem is ice damming, which occurs when water accumulates in the attic and under the shingles. This can cause leaking into the interior of your home, which can lead to mold and mildew problems.
During your inspection, make sure to take pictures and detailed notes about any damage you find. This will help you document the extent of the damage and make a more convincing case to your insurer if your claim is denied. If your claim is approved, this documentation will come in handy when the roof repair contractors begin work. You should also ask to have a professional come out to perform the work, as they’ll be familiar with the details of your roof and any relevant building codes.
Remove the Damaged Shingles
Depending on the extent of damage, the roof may need to be completely replaced or it may just require a few touch-ups. The first step is to remove the damaged shingles and replace them with new ones.
To begin the process, you’ll need to assemble your tools and a ladder. You’ll also want to make sure that you have some type of harness or safety rope and appropriate eyewear.
Before you begin the actual removal of the shingles, it’s important to loosen them up and expose the nails beneath. A flat pry bar, crowbar, or even the claw of a hammer will work well for this purpose. Just be careful not to get too aggressive or you’ll risk damaging the shingle underneath.
Once you’ve loosened the shingles, you can begin removing them one at a time. To do so, start with the shingle that’s closest to the damaged area. You can usually find the nails by looking for the black tar strip that runs along the underside of each shingle. Using a flat pry bar, start at the bottom of the damaged shingle and gently pry it up. You’ll be able to hear the nails snap beneath, but don’t force it up or you could tear the shingle underneath it.
The next shingle over will be easier to remove as the nails aren’t covered by the shingle above it. Repeat the same steps to remove the shingle above and below until you reach the damaged shingle. Once the shingle is removed, be sure to discard it in a safe location and don’t try to save it.
As you continue to remove the shingles, be careful not to tear any of the other ones that are intact or it could cause leaks in the future. This is particularly important when it comes to older roofs that have been through many storms.
Once you have the damaged shingles removed, you’ll need to remove the nails from the row above them and replace them with new ones. A shingle nailer works well for this, but it’s also helpful to have some roofing cement handy. This way, you can apply a spot of cement under each tab to help secure the new shingle in place.
Repair the Damaged Flashing
Roof flashing is a thin metal strip that prevents water from seeping into your home at vulnerable points such as chimneys, vent pipes, skylights, and valleys. It also seals the roof edges and eaves and guides rainwater into gutters. When roof flashing becomes damaged or deteriorates, it can lead to leaks and other costly roofing issues. There are several methods for repairing roof flashing, ranging from simple sealant applications to replacing the damaged sections of your roof.
Age-Related Deterioration: Over time, your roof flashing can deteriorate due to exposure to the elements, resulting in gaps, cracks, and loose sections that can allow water to seep through. This is particularly common in metal flashing, where the elements can eat away at the material and weaken it.
Improper Installation or Weather Conditions: Heavy winds, freezing temperatures, and precipitation can cause flashing to shift or become dislodged from the roof. This can leave holes in the flashing that can allow water to seep through, or it may create improper seals around the roof penetrations.
Other Causes of Roof Flashing Damage
The most common signs of flashing problems include visible gaps or cracks, rust or corrosion, and physical damage such as bent, warped, or missing pieces of the flashing. It’s also important to keep in mind that flashing can be compromised by leaks that can result from the penetration of shingle debris or other sources of water, as well as by structural damage such as rotting wood or weakened rafters and ceiling supports.
If you are not comfortable working on your roof and you notice that your flashing is in need of repair, you should contact a professional roofing contractor. They will have the tools, experience, and equipment to complete the repair quickly and safely.
If the damage to your flashing is minor, you can use a commercial roofing sealant such as silicone or polyurethane to fill any gaps or cracks. Be sure to clean the area thoroughly before applying the sealant and ensure that it adheres tightly to create a watertight seal. However, this is only a temporary fix and you will need to call a roofing repair expert to replace the damaged flashing for long term security.
Replace the Substrate
The substrate is the underlying material that supports your roof covering. It is a vital element of your home, protecting the structure, insulation and everything else in it from damage caused by rain, sun and wind. When the underlying material becomes damaged, it is essential to repair it or replace it.
If your blister is associated with a leak, soak it thoroughly and allow to dry for 12 to 24 hours. If you’re not replacing the substrate, simply mend the tear with a rubber patch or tar paper. Apply a generous coating of cement over the area, press the patch down, and drive galvanized roofing nails around its perimeter.
If you’re repairing a membrane roof, check the manufacturer’s technical literature for substrate requirements. Generally, membranes are installed over plywood substrates that meet E2/AS1 or BRANZ good practice guidelines. Ensure that the plywood is kiln-dried and H3 CCA-treated and has a minimum fall of 2deg or more. It should be laid in a staggered pattern, with 20mm H3.2 angle fillets to vertical upstands and 400mm maximum centres. Install a layer of insulation board, preferably EPS or XPS, on top. Sand the plywood surface, joints and countersunk fasteners to remove splinters. Vacuum or sweep to remove surface dust and dirt.