Enhancing Your Smile With Veneers And Bonding

Treatments boca Dental And Braces can enhance your appearance and boost your confidence. They also help you avoid discomfort caused by crooked, cracked, or discolored teeth.

A captivating smile makes a powerful first impression in personal interactions and job interviews. It can even increase your willingness to take risks and seize opportunities that come your way.
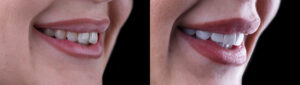
veneers

Veneers

When it comes to concealing flaws such as chips, cracks, discoloration, gaps, or misshapen teeth, veneers are among the most effective cosmetic dental procedures. These thin ceramic shells are bonded to the front of your teeth. They offer similar luster and translucence as natural tooth enamel, making them blend in with your smile seamlessly.

Veneers can be made of a variety of materials, though composite resin is the most common. Your dentist sculpts and applies them in a single session. They are reversible, meaning you can take them out at any time if you want. They do not require the same level of maintenance as other treatments, but you will need to follow good oral hygiene practices, including brushing and flossing regularly. You should also avoid chewing on hard objects, and avoid using your teeth to open packaging or cut items. You may notice some rough patches in the first few days after getting veneers, but these will improve over time. If they do not, your dentist can smooth the veneers.

During your initial visit, the dentist will discuss your cosmetic goals and answer any questions you may have about the procedure. They will then examine your teeth and gums to determine if you are a suitable candidate for veneers. If you are, they will prep the selected teeth by removing a very thin layer of enamel (less than the thickness of a fingernail). A temporary restoration is placed while the permanent veneers are fabricated in a lab.

At your next appointment, the dentist will remove the temporary restoration and place the permanent veneers, ensuring they fit perfectly and are color-matched to your surrounding teeth. They will bond the veneers to your teeth and cure them with a special light beam. They will ask you to return for a follow-up visit in a few weeks to monitor how your teeth adjust to the veneers and make any necessary adjustments. With proper care, your new veneers can last 10-15 years. However, they are not as stain-resistant as your natural teeth, so it is important to limit exposure to coffee, tea, red wine, and tobacco.

Bonding

If you’re looking to give your smile a little cosmetic touch-up, it may be time to visit the cosmetic dentist. But how do they differ from a traditional dentist, and what can they do to make your smile more attractive?

A cosmetic dentist can help you hide stains and improve the overall appearance of your teeth. They can also help you fix crooked or misshapen teeth and correct other dental issues. While these procedures can be more expensive than other treatments, they can save you money in the long run by preventing more costly problems down the road.

Most people have some minor dental flaws that they want to correct. A common issue is tooth discoloration, which can occur due to a variety of reasons. Other issues include crooked or misshaped teeth, chips, and cracks. Some people are even unhappy with their gum line or the shape of their lips. While these issues can cause discomfort, they can also affect your self-esteem. A cosmetic dentist can help you address all of these issues, and they can do so in a less-invasive way than other types of treatment.

While traditional dentists focus on oral health, cosmetic dentists are trained to make your teeth look healthier and more appealing. They can perform a variety of cosmetic procedures, including veneers and bonding.

When it comes to repairing cosmetic dental issues, dental bonding is a quick and affordable option. The procedure involves applying a tooth-colored resin to your teeth and then curing it with a special light. This material can fill in small chips and cracks, close gaps, and change the shape or color of your teeth.

To prepare for a dental bonding appointment, it’s important to brush and floss thoroughly before seeing your cosmetic dentist. This will ensure that your teeth are clean, which will allow the cosmetic dentist to work with a clean canvas. You’ll also want to discuss your goals for your smile with the dentist before undergoing any treatment. This will allow them to create a plan that will achieve your desired results.

Teeth Whitening

A radiant smile is a sign of good health and is essential for both your emotional and physical well-being. If you are not satisfied with the appearance of your teeth, cosmetic dentistry may be able to help. From teeth whitening and bonding to veneers, tooth and gum contouring, dental implants, and more, cosmetic dentists offer a range of treatments to give you the perfect smile you deserve.

While a general dentist offers preventative care, like teeth cleanings dental fillings, and restorative procedures to repair damaged or diseased teeth, they are not trained in the art of enhancing your smile. In contrast, a cosmetic dentist has completed advanced training and is skilled in restoring the appearance of your smile as well as improving its function.

Teeth whitening is one of the most popular cosmetic dental treatments available and a cost-effective way to improve the look of your smile. It is also safe and quick, typically taking less than an hour. The procedure is performed with a bleaching agent, usually hydrogen peroxide, and is applied to your teeth via trays or gel.

Another option is porcelain veneers, which are thin and strong shells that cover the front of your teeth to hide several cosmetic flaws. These include chipped or cracked teeth, discoloration, minor gaps, and more. Veneers can be a permanent solution, but they need to be replaced periodically.

A third cosmetic treatment is composite bonding, which uses a tooth-colored resin to enhance your smile. It can be used to close gaps, repair chipped or broken teeth, change the shape of a tooth, or replace old silver fillings. Bonding is a non-invasive treatment that can be done in a single appointment, and it is a more cost-effective alternative to porcelain veneers.

A beautiful smile can have many benefits, including a boost in confidence and improved opportunities at work and socially. In addition, it can increase your attractiveness to the opposite sex and make you appear healthier and happier. However, the benefits of cosmetic dentistry are only fully realized when you visit a trusted and experienced cosmetic dentist. By following their instructions, you can ensure that your new smile lasts for years to come.

Dental Implants

If you’re dissatisfied with your smile, cosmetic dentistry can help. Cosmetic treatments can improve dental aesthetics, including color, shape, size, alignment, and the gum line of your teeth and bite. They don’t repair or treat disease; they enhance the look of your natural smile. A cosmetic dentist can provide a wide range of treatments, from simple to complex.

Teeth whitening, veneers, and dental implants are some of the most common cosmetic treatments. Unlike dentures, which must be removed at night and are not always comfortable for eating, dental implants look, feel, and function like your natural teeth. These durable, tooth-colored restorations are crafted from porcelain, which has a strong resemblance to natural tooth enamel and reflects light like it. They also blend in with your other teeth and can improve the appearance of crooked or misaligned teeth.

Dental veneers are paper-thin, custom-made porcelain laminates that bond to the front of your teeth. They can close gaps, reshape misshapen or slightly crooked teeth make minor corrections in alignment, and give you a whiter, brighter smile. Because they are so durable, they should last for years and resist staining, allowing you to enjoy your enhanced smile without the need for frequent touch-ups.

Tooth-colored fillings (inlays and onlays) are a cosmetic alternative to silver amalgam fillings. These fillings are created in a dental laboratory and bonded to the surface of your teeth. They can fill decayed or damaged teeth while preserving more of the tooth’s natural surface than traditional fillings.

If you have a missing tooth or several missing teeth, dental implants can restore your confidence and the structure of your mouth. An implant consists of a titanium screw that is inserted into the jaw bone where a lost tooth once stood. A replacement tooth is then attached to the post. Over time, the implant and your natural teeth will fuse.

Although the term “cosmetic dentistry” is not technically accurate, it describes the treatments that we use to enhance the look of your smile and are typically not considered restorative. Some examples include dental crowns, bridges, and dental implants. When combined with restorative procedures, such as teeth whitening or braces, these cosmetic options can create a healthier, more beautiful smile.

What Is Land Surveying?

A land survey is a scientific process that uses a variety of tools to create vectors, bearings, coordinates, elevations, areas and plans. It also involves interpreting data to produce CAD-drawn survey maps and legal descriptions.

Land Surveying

Land surveyors are professionals that measure straight lines and right angles with specialized equipment. They then use this information to create a cadastral or survey-grade map of the parcel in question for legal documentation purposes. Contact Element Land Surveying for professional help.

Boundary surveys determine and delineate legal property lines. They help avoid neighborly disputes, promote peaceful development and land use, and ensure compliance with local zoning regulations. They also provide documentation for future property transactions and serve as objective evidence in court proceedings.

To perform a boundary survey, land surveyors start with on-site measurements and a thorough data collection process. They then compare this information with historical records to accurately pinpoint property boundaries. Using advanced tools and techniques, such as GPS technology and robotic instruments, they can measure distances and other parameters to calculate the exact location of property lines.

After collecting all of this data, the surveyor prepares a comprehensive report and map of the surveyed area. It includes all relevant information, including the surveyed boundaries, legal descriptions, referenced deeds, and surveyor’s certification. In addition, the report should include recommendations for resolving any issues that may arise from the survey. The final product is a clear and comprehensible document that can be used for legal purposes or property transactions.

Elevations

A topographical survey is one of the most common types of land surveys and focuses on changes in elevation. This type of survey provides valuable information that is essential for many purposes, including infrastructure planning and zoning laws. A topographical survey can also help us identify whether an area is prone to flooding or other environmental hazards, and it can provide valuable insights into the best way to use our property.

To determine elevations, a surveyor can measure the slope and distance between two points by using tools like laser measuring devices or pocket tapes. A more accurate method is to establish a bench-mark, or starting point, at a known elevation, such as 100 ft above sea level. From there, the surveyor can take a series of readings (or traverse) with a leveling staff, recording the results in a table.

Surveyors can use this data to calculate contour lines, which are areas where the land slopes or changes in elevation. This is important information for anyone who works with the land, from architects to engineers. It helps them design structures that are compatible with the terrain, reducing the need for costly modifications during construction. They can also predict any potential problems that might arise, such as water runoff or soil erosion, and make adjustments accordingly.

Setbacks

If you’re thinking of purchasing a property, it’s important to have it surveyed to determine the exact boundaries. This will help to prevent any disputes in the future and ensure that you don’t violate any setbacks. Land surveys also identify whether a property is located in a floodplain. These factors can affect the cost of a survey, so it’s important to evaluate your options and consider your needs before hiring a land surveyor.

Surveyors use a combination of traditional instruments and digital technology to produce surveys, data, and maps describing the Earth’s surface features. They apply elements of geodesy, geometry, trigonometry, regression analysis, physics, engineering, metrology, programming languages and the law to achieve their goals. They also use equipment such as total stations, robotic total stations, theodolites, GNSS receivers and 3D scanners.

Land surveying is the practice of establishing or reestablishing corners, lines, boundaries, and monuments on real property (land) based upon recorded documents and historical evidence. It includes associated services such as subdivision planning and design, writing legal descriptions, mapping, construction layout, and precision measurements of angle, length, area and volume. Surveyors also have extensive knowledge of zoning regulations and wetland delineation. In addition, they must have a strong understanding of computer software and Geographic Information Systems (GIS). These skills are essential in today’s land surveying industry.

Boundary disputes

Boundary disputes can arise from many factors, including a lack of clear legal descriptions in property deeds, encroachment, or disagreements between landowners. Disputes can escalate into costly legal battles and strain neighborly relationships, but professional land surveyors can help resolve them through careful analysis, precise measurements, and clear documentation of property lines.

They may also act as mediators or facilitators to encourage communication and compromise between neighbors. If dialogue and agreement fail to produce a satisfactory outcome, they can provide expert testimony based on their thorough analysis and adherence to industry standards.

Land surveyors also ensure that their work meets regulatory requirements set by local governments and state laws. This helps protect the interests of property owners and maintain the integrity of surveying practices.

It is important to have a legal property boundary survey before constructing new structures on your property. A survey will ensure that your construction does not encroach on the boundaries of other properties, which could result in costly lawsuits. Additionally, a property survey can be helpful in preventing future disputes. For example, if you have an old fence that is believed to be the property boundary, you can prevent a dispute by having your surveyor mark the actual property line with flags or monuments.

Construction layout

A construction layout survey is a type of land survey that provides information about the location of improvements based on a construction plan. This information is used by contractors to construct buildings, roads, and other infrastructure. It also ensures that structures are placed in their correct locations on a site. This is a crucial step in construction, and mistakes can have significant consequences for the project.

The purpose of construction staking is to help contractors locate their work based on the engineer’s or architect’s plans. A construction layout survey includes staking the foundation and footing locations and dimensions of buildings, as well as locating and indicating the placement of utilities (water lines, sewer lines, electrical conduits, and communication cables). It can also include center lines and offset points.

The first part of a construction layout survey is the staking of building corners and lot corners. This can be done with stakes, nails or flag markers. It is important that all known points are clearly marked so that they can be measured accurately. These marks should remain intact during excavation. This is accomplished by using batterboards, which are boards that provide a stable base for the stakes.

GIS

GIS (Geographic Information Systems) in Land Surveying is the integration of geospatial data into a system for storage and analysis. This allows for more accurate and cost-effective surveys. It also provides a powerful tool for analyzing and comparing data, and making better decisions. It’s one of the most valuable tools for today’s land surveyors.

Before the advent of GIS, land surveyors had to gather and analyze data manually using various methods. This process was time-consuming and tedious. Moreover, it was susceptible to human error. Consequently, it was not as effective as the current technology used in GIS.

With the help of GIS, a surveyor can create a digital map of the area that has been surveyed. This map can include details such as property lines, structures, and other features of the area. It can also be viewed in 3D. The mapping process is also much faster, and less expensive. Moreover, it helps in solving boundary issues and negotiating with neighbors. It also helps in planning construction work and preparing for drainage systems. It’s important for real estate developers to have this map in place before starting a project. It can help them avoid costly mistakes.

3D laser scanning

While other surveying methods require human measurements and site visits to capture data, 3D laser scanning is a faster, more accurate and cost-efficient way to gather information. It can capture millions of data points in minutes and create a 3D point cloud model that accurately depicts the scanned area. This helps to identify unforeseen aspects of a project and provides stakeholders with access to the data even if they are not physically present on site.

This technology is especially helpful for capturing complex areas and large structures that may be difficult to reach or measure using traditional methods. It also reduces health and safety risks, as it eliminates the need for staff to enter high risk or restricted environments to perform a scan. This can be particularly beneficial for urban environments, industrial locations and rail assets as well as commercial warehouses, steelwork and gantries.

In addition to providing a detailed visual record, 3D laser scanning can be used to develop 2D CAD drawings and 3D BIM models. This makes it easier for teams to find & avoid clashes, plan, assess progress and update record drawings with greater accuracy.

The Basics of Pest Control

Pest Control Springfield MO involves identifying and managing organisms that damage or interfere with the health of humans, plants, or animals. Threshold-based decision-making focuses on determining the number of pests that are unacceptable and the best tactics for controlling them.

Preventing pests begins with eliminating their sources of food and water. Store foods in sealed containers and remove garbage regularly. Caulk gaps around doors and windows and repair torn screens.

Prevention is a form of pest control that involves keeping pests out of an area, often by creating physical barriers. It can also include removing food, water, and shelter from a pest’s environment. This may be as simple as putting up netting to keep birds away from fruit trees or as complex as altering the design of an industrial processing facility to prevent rodents from entering the building. Prevention may also include monitoring and treating an area once a pest problem is detected.

Sometimes, pests must be treated with chemical compounds to eliminate them. These are called pesticides and can be a very effective form of pest control. However, the use of pesticides can be dangerous and should only be performed by trained and certified specialists. Pesticides must always be used in accordance with product labels and should never be abused, such as by applying more than the recommended amount or by transferring pesticides to other containers. They must also be used in safe places where they will not come into contact with people or pets.

The best way to avoid pest problems is to stop them from arising in the first place. This is known as preventative or prophylactic pest control. Preventive measures include keeping food in tightly closed containers, storing food in rodent-proof bins, using traps to catch or kill unwanted animals and cleaning up spilled foodstuffs. It is also important to remove any sources of food, water or shelter for pests, such as piles of rubbish or overgrown vegetation.

Suppression is the most common form of pest control in homes and other buildings. It is used when the pests are causing or likely to cause a threat to human health, property or economic viability. Suppression usually includes spraying, baiting and trapping. It can also include fumigation and heating. For example, heat or freezing treatments can be used to destroy pests that live in stored grain or meat products.

Eradication is rare in outdoor situations, but it can be attempted when a specific pest is deemed to be of major concern, such as the Mediterranean fruit fly or gypsy moth. It is also sometimes tried in enclosed areas where the presence of certain pests can be disastrous, such as in operating rooms and other sterile environments in health care facilities.

Suppression

The goal of suppression is to reduce pest numbers and/or damage to an acceptable level. Pests are often repelled by cultural controls such as plowing, crop rotation, cleaning tillage equipment and removing infected plant material. Cultural controls may also include managing irrigation schedules to prevent long periods of high relative humidity that favor disease pests.

Chemical control is an important part of a comprehensive pest management program and includes the use of insecticides, herbicides, fungicides and other chemicals. The Environmental Protection Agency (EPA) registers many products that are effective against pests, and many of these are available in a variety of forms, including sprays, baits, dusts, powders, granules and injections. Chemicals must be used carefully to avoid contaminating other plants or people and to limit off-target impact.

A combination of prevention and control methods is usually needed in any commercial food facility. Some pests, such as the cockroach and bed bugs, are persistent and require repeated treatments to keep them below their economic thresholds. Other pests, such as rodents and flies, can be controlled by eliminating harborage and reducing food access.

Some pests have a zero tolerance level and cannot be present in any setting, such as operating rooms and other sterile areas of health care facilities. Eradication is generally not a goal in outdoor pest situations, but is possible in confined environments such as food establishments and offices.

Preventing pest infestations is less expensive than eradicating them, so it is important to focus on prevention whenever possible. Educate customers on how to keep pests away from their facilities by sealing cracks, caulking holes, and making sure that all equipment is clean. Also, encourage the use of natural insect repellents such as cedarwood, lavender and eucalyptus. Repellents are made from natural oils that deter insects by scent and can be sprayed or rubbed on surfaces. They can be purchased from most garden or home centers. Be sure to read the product label, which contains detailed instructions on how to safely use a repellent and may list potential hazards. If these measures are ineffective, hire pest control professionals to handle eradication programs.

Eradication

A pest is any organism that negatively impacts human activities, crops or the environment. It may be an insect, plant or fungus. Pest control involves regulating, deterring, or eliminating those organisms that cause damage. This can be achieved through physical methods such as traps and barriers or chemical means using pesticides.

When pesticides are used, they are generally the fastest and most effective way to control pests. However, they can also be the most dangerous form of pest control if they are not applied properly and monitored closely. Failure to control a pest population after a pesticide application could indicate that the chemical was ineffective, not properly mixed with water or other chemicals, or was applied at a time when the pest was not in its most vulnerable stage.

Other forms of pest control can be natural or organic. This includes introducing a pest’s natural enemies such as predators, parasites and pathogens to control it. This can be supplemented by releasing larger numbers of the enemy to accelerate its effect.

Temperature control can also be an important form of pest control. Both hot and cold temperatures can kill many pests, either by directly killing them or by destroying their eggs or larvae. In addition, growing produce in insulated containers slows or eliminates the growth of some pests.

In the most extreme form of pest control, eradication is the permanent reduction to zero of the worldwide incidences of infection caused by a particular disease as a result of deliberate efforts. To date, only 2 diseases have been eradicated: smallpox from the variola virus and rinderpest from the rinderpest virus (RPV).

Eradication is not usually possible for plants or animals that are highly adaptable. Moreover, the loss of habitat or environmental changes can overwhelm even intensive eradication efforts. For example, in the US, a combination of intense eradication effort and habitat destruction led to the extinction of Rocky Mountain grasslands and the subsequent loss of the sagebrush ecosystem. Nevertheless, eradication is still an important objective for protecting public health from the diseases that pests carry, safeguarding agriculture and food supplies, preserving property from damage, and maintaining ecological balance.

Biological Control

Biological control involves the use of organisms that naturally attack and kill pests. These natural enemies may be predators, parasites, diseases or herbivores. People employ three general ways to use these organisms in home landscapes, greenhouses and agriculture: they import, augment or conserve them. Biological control is an important component of IPM programs but is not a substitute for other preventive measures such as cultural, physical or mechanical controls.

Species that are new to an environment often have problems when they first enter it, including being killed off or reduced in population by their natural enemies. Because populations of such “introduced” species can explode and overtake native ones, they are sometimes considered pests. The discovery of their natural enemy species, which have not co-evolved with the new invader, is a major goal of biological control research. Such efforts can lead to the effective long-term control of certain pests, such as the destruction of gypsy moth (Lymantria dispar) by parasitic wasps introduced from Europe; the limiting of growth of cassava mealybugs in tropical America by the parasite Coccophagus tetracnemus; and the control of several insect crop pests in home gardens by Bacillus thuringiensis.

A similar approach is to use “non-permanent” biological control agents that do not seek to establish populations that reach long-term balance with their host or prey. This approach is sometimes called augmentation, inundative or inoculative biocontrol and can be used to control pests that are already at damaging levels. This approach is commonly employed with nematodes and plant pathogens.

The most demanding form of biological control is establishing a co-evolved balance between the introduced pest and its natural enemy in the wild or greenhouse. This approach requires a great deal of research into the biology of the pest, potential natural enemies and their host or prey plants, as well as the unintended consequences (positive or negative effects on native species that are not pests and/or other natural enemies of the introduced pest). Once suitable organisms have been found and reared, they must be released in a controlled manner to ensure their survival and to manage their interaction with the pest.

Understanding The Life Cycles Of Common Pests For Better Control

Pests can cause serious damage to your property if they are left untreated. This is why it’s important to understand their life cycle so that you can use Armis Pest Management methods at the right time.

A pest’s life cycle consists of several stages that vary in length. Understanding these stages helps you to prevent pest infestations by targeting them at the most vulnerable stage of development.

pest control

Egg Stage

The life cycle of an insect is divided into four distinct stages – egg, larva or nymph, pupa, and adult. Pests that have a complete life cycle include beetles, moths, caterpillars, and leaf-feeding beetles (caterpillars). Those with an incomplete life cycle can cause damage at more than one stage. For example, ants can damage plants in the egg, larva, and adult stages.

Many pest species lay eggs in damp soil or other substrates. The eggs then hatch into a larva or nymph, which feeds on organic material until it matures. The larva or nymph then goes through several molting stages and transforms into a pupa before it becomes an adult. Depending on the type of pest, the egg and larval stages can have significant negative impacts on crops.

In some cases, pests can be controlled by targeting specific life cycles. For example, mosquitoes require standing water for breeding, so interrupting this phase with proper preventative measures can help control their numbers. Flies also have an aquatic phase, and disrupting their reproduction can significantly reduce their impact on humans, animals, and gardens.

Flies’ mating behavior involves males displaying elaborate courtship displays to attract females using scent, sound, and visual cues. They can lay up to 500 eggs in a single day and select locations near decaying organic matter where they will lay their eggs. Once hatched, fly larvae are voracious feeders and play an important role in breaking down organic matter and recycling nutrients.

When beetles and moths lay their eggs in or on a plant, the young larvae burrow into the soil, feeding on roots and tubers, leaves, flowers, and fruits. This damages the plant and can result in stunting or death. The length of the larval or nymphal stage can vary from less than 30 days to one or more years for different kinds of beetles.

Bean leaf beetles and hornworms also have a damaging larval or nymphal stage, and both the beetles and their nymphs can damage fruit. As the name suggests, these insects attack beans and legumes, but they can girdle tomato and pepper plants as well.

Larval Stage

Once a pest species’ eggs hatch, it enters the larval stage. The larva is a specialized feeding stage that doesn’t look very much like the adult pest and has unique characteristics and behaviors of its own. Larvae consume food to grow and develop, shed their skin several times (this is called molting), and may even be able to suck liquids out of plants that they are eating.

The frog hopper is a good example of a larva that can suck out the liquid of its prey. Its larval mouthparts are specially adapted for this purpose. It also allows the hopper to move rapidly in search of new food, which can lead to higher encounter rates and feeding success.

After the larva reaches maturity, it becomes a pupa. The pupal stage is a non-feeding and immobile stage of the life cycle. It’s during the pupal stage that many pests become most vulnerable to preventative and control measures.

It is important to understand the importance of this life-cycle stage when planning pest control activities. By knowing that pests are most vulnerable during this period, you can target prevention and control measures at the most effective time. This could prevent the development of a pest infestation from occurring or becoming unmanageable on your property.

Many animal species have a complex life cycle that contains distinct postembryonic stages – namely, egg, larva or nymph, and adult. The development of these separate life stages, known as metamorphosis, gives the individual species the ability to adapt and occupy different ecological niches. For instance, barnacles and tunicates have pelagic larvae that move to a suitable habitat before molting to settle into their adult form. Likewise, the larvae of sea-floor invertebrates such as mussels and crabs need to move into a new territory when they mature into nauplius forms. This process is also known as dispersal.

Pupa Stage

Insects that undergo complete metamorphosis have a pupal stage as well. The pupal stage usually takes place in a cocoon or some kind of protective case. Inside this, the insect goes through major changes to become an adult. Some pests, like mosquitoes, emerge from the pupal stage ready to seek blood for reproduction. Others, such as rodents, spend a good portion of the year in their pupal form before they’re ready to reproduce and cause damage.

As the larva reaches the end of its final instar, it secretes special cells that will transform it into an insect adult. These cells are called imaginal discs. The imaginal discs rest dormant until some cue (temperature, day length, growth, etc) triggers the hormones that will kickstart the pupal process. Once triggered, the larva sheds its outer layer of skin. As it does so, the imaginal discs assemble into the insect’s new, mature body.

During the pupal stage, insects remain inactive. The exception is some ant species, which can move around while in the pupal phase. These ants are sometimes referred to as “nymphs.”

The transformation from larva to adult can take a couple of weeks, a few months, or even a few years. It all depends on the temperature and the species. If it’s cold, the process will slow down considerably.

A few insect groups don’t have a pupal stage, such as cockroaches and crickets. In this case, the newly hatched nymph looks much like the adult insect it will eventually become. The only difference is that the adult nymph may have wings or reproductive organs. This type of nymph is sometimes called an object or exarate pupa. Other insect groups have functional mandibles that can cut their way out of the pupal cuticle, or adect their way out. These types of pupa are sometimes referred to as adect or exarate.

When it comes to damaging plants, grubs and beetles are the most destructive of all insects. The wormlike, legless larvae of these pests feed on the roots and other underground parts of the plant, causing severe crop damage. Once they reach maturity, the larvae either dig themselves into the soil for a prolonged hibernation or drop to the ground where they create oval pupal cells in the soil.

Adult Stage

The adult stage is the last of four pest stages and the one that usually causes the most damage. Adult insects are easy to spot and can be controlled with targeted insecticides and biological controls. However, interrupting the pest’s life cycle at the egg or larval stage is the best way to control the pest.

Some pests have incomplete life cycles, meaning that they hatch from eggs into nymphs which look similar to the adults and remain in this nymphal stage until they mature into adulthood. Insects with incomplete life cycles include the grasshopper, true bugs (stink bug and squash bug), and cabbage maggots. These insects injure plants by piercing and sucking juices or by chewing leaves and stems.

Other insects have complete life cycles, such as beetles and moths. These lay their eggs either singly or in groups, and the eggs hatch into grubs that feed on the roots, tubers, or leaves of the plant. After reaching maturity, grubs form a protective cocoon, which is called pupa, and the moth or beetle emerges into the adult stage.

These insects injure plants by chewing leaves and stems, sucking juices, or spreading diseases. Some, like the bean leaf beetle, cause significant crop losses. These beetles overwinter in or near crop residue and damage soybeans by feeding on the underside of the leaves, leaving rounded holes. They also attack the pods and may girdle the plant.

Other insects, such as aphids, mites, and gall midges, have complete life cycles and are easier to control than adults. The aphids are especially difficult to control once the populations reach an outbreak level. In addition, the aphids are often more difficult to control during hot and dry weather.

Some insects are perennial pests, meaning that they exist in some locations year after year, such as the plum curculio, flea beetles, and striped cucumber beetles. Others, such as the gypsy moth and cankerworms, have irregular boom and bust patterns. The fluctuations appear to be caused by factors such as weather, competition with other insects, and disease.

Roof Repair – Repairing a Damaged Area of a Roof

Roof repair involves fixing a damaged area of a roof. It is typically less costly than a full replacement.

Many homeowners wonder if they need to have their roofs re-roofed after a storm with significant damage. The answer depends on several factors. Click Here to learn more.

A new or fairly new roof that shows a few dents and some loss of granules may only need repair.

After a storm, it’s important to assess the damage to your roof. This can help you determine whether your roof needs emergency repairs or can wait for a routine repair. A thorough inspection may also help you understand how your insurance company works with homeowners to cover the cost of roofing storm damage.

First, look for any signs of shingle damage on the ground. Wind damage may be obvious as it causes shingles to flap and become separated from each other. It can also cause shingles to lose their asphalt coating, leaving them vulnerable to further weathering and moisture ingress. Hail damage is also fairly easy to see. If the hail is large, it can leave dents in metal downspouts or outdoor HVAC units. However, if the hail is smaller, it can be more difficult to spot from the ground. You can try to look for dents in the attic or on living space ceilings, but you should always have a professional inspect your roof after any major storms.

In addition to shingles, you should also look for damage to your roof flashing, which is the strip of tar or caulking that seals between your roof and the rest of your house. If the flashing is damaged, water can leak into your home, potentially causing extensive damage to the structure and interior finishes.

Another common problem is ice damming, which occurs when water accumulates in the attic and under the shingles. This can cause leaking into the interior of your home, which can lead to mold and mildew problems.

During your inspection, make sure to take pictures and detailed notes about any damage you find. This will help you document the extent of the damage and make a more convincing case to your insurer if your claim is denied. If your claim is approved, this documentation will come in handy when the roof repair contractors begin work. You should also ask to have a professional come out to perform the work, as they’ll be familiar with the details of your roof and any relevant building codes.

Remove the Damaged Shingles

Depending on the extent of damage, the roof may need to be completely replaced or it may just require a few touch-ups. The first step is to remove the damaged shingles and replace them with new ones.

To begin the process, you’ll need to assemble your tools and a ladder. You’ll also want to make sure that you have some type of harness or safety rope and appropriate eyewear.

Before you begin the actual removal of the shingles, it’s important to loosen them up and expose the nails beneath. A flat pry bar, crowbar, or even the claw of a hammer will work well for this purpose. Just be careful not to get too aggressive or you’ll risk damaging the shingle underneath.

Once you’ve loosened the shingles, you can begin removing them one at a time. To do so, start with the shingle that’s closest to the damaged area. You can usually find the nails by looking for the black tar strip that runs along the underside of each shingle. Using a flat pry bar, start at the bottom of the damaged shingle and gently pry it up. You’ll be able to hear the nails snap beneath, but don’t force it up or you could tear the shingle underneath it.

The next shingle over will be easier to remove as the nails aren’t covered by the shingle above it. Repeat the same steps to remove the shingle above and below until you reach the damaged shingle. Once the shingle is removed, be sure to discard it in a safe location and don’t try to save it.

As you continue to remove the shingles, be careful not to tear any of the other ones that are intact or it could cause leaks in the future. This is particularly important when it comes to older roofs that have been through many storms.

Once you have the damaged shingles removed, you’ll need to remove the nails from the row above them and replace them with new ones. A shingle nailer works well for this, but it’s also helpful to have some roofing cement handy. This way, you can apply a spot of cement under each tab to help secure the new shingle in place.

Repair the Damaged Flashing

Roof flashing is a thin metal strip that prevents water from seeping into your home at vulnerable points such as chimneys, vent pipes, skylights, and valleys. It also seals the roof edges and eaves and guides rainwater into gutters. When roof flashing becomes damaged or deteriorates, it can lead to leaks and other costly roofing issues. There are several methods for repairing roof flashing, ranging from simple sealant applications to replacing the damaged sections of your roof.

Age-Related Deterioration: Over time, your roof flashing can deteriorate due to exposure to the elements, resulting in gaps, cracks, and loose sections that can allow water to seep through. This is particularly common in metal flashing, where the elements can eat away at the material and weaken it.

Improper Installation or Weather Conditions: Heavy winds, freezing temperatures, and precipitation can cause flashing to shift or become dislodged from the roof. This can leave holes in the flashing that can allow water to seep through, or it may create improper seals around the roof penetrations.

Other Causes of Roof Flashing Damage

The most common signs of flashing problems include visible gaps or cracks, rust or corrosion, and physical damage such as bent, warped, or missing pieces of the flashing. It’s also important to keep in mind that flashing can be compromised by leaks that can result from the penetration of shingle debris or other sources of water, as well as by structural damage such as rotting wood or weakened rafters and ceiling supports.

If you are not comfortable working on your roof and you notice that your flashing is in need of repair, you should contact a professional roofing contractor. They will have the tools, experience, and equipment to complete the repair quickly and safely.

If the damage to your flashing is minor, you can use a commercial roofing sealant such as silicone or polyurethane to fill any gaps or cracks. Be sure to clean the area thoroughly before applying the sealant and ensure that it adheres tightly to create a watertight seal. However, this is only a temporary fix and you will need to call a roofing repair expert to replace the damaged flashing for long term security.

Replace the Substrate

The substrate is the underlying material that supports your roof covering. It is a vital element of your home, protecting the structure, insulation and everything else in it from damage caused by rain, sun and wind. When the underlying material becomes damaged, it is essential to repair it or replace it.

If your blister is associated with a leak, soak it thoroughly and allow to dry for 12 to 24 hours. If you’re not replacing the substrate, simply mend the tear with a rubber patch or tar paper. Apply a generous coating of cement over the area, press the patch down, and drive galvanized roofing nails around its perimeter.

If you’re repairing a membrane roof, check the manufacturer’s technical literature for substrate requirements. Generally, membranes are installed over plywood substrates that meet E2/AS1 or BRANZ good practice guidelines. Ensure that the plywood is kiln-dried and H3 CCA-treated and has a minimum fall of 2deg or more. It should be laid in a staggered pattern, with 20mm H3.2 angle fillets to vertical upstands and 400mm maximum centres. Install a layer of insulation board, preferably EPS or XPS, on top. Sand the plywood surface, joints and countersunk fasteners to remove splinters. Vacuum or sweep to remove surface dust and dirt.

How to Get Rid of Stains on Your Windows

Experts recommend Window Cleaning Sarasota inside and out at least twice per year. It’s also a good idea to clean them on a regular basis, especially in areas where pollen, bird droppings and road salt are common.

window cleaning

Start by wiping away dirt and debris with a dry microfiber cloth or chamois. Use a fan-shaped motion with the cleaner to avoid leaving streaks.

There are a number of different cleaning methods used by window cleaners, including vinegar solutions, soapy water solutions, and commercial glass cleaners. Some of these can be used as sprays, while others are applied with cloths or sponges. It’s important to know which cleaning solution to use for each type of stain, as different solutions work better on certain types of stains.

For most windows, a basic vinegar solution is sufficient. Mix equal parts white vinegar and water in a spray bottle, then apply to the window. After spraying, wipe the surface with a microfiber cloth or sponge and proceed to rinse the window, working from top to bottom to prevent drips. If necessary, a small amount of dish soap may be added to the solution, depending on the level of dirt.

If cleaning high windows, a sponge mop may be required. The mops can be used on either the hose or water wand, and can be cleaned with either a vinegar and water solution or a commercial cleaner. The mops can be used on both the inside and outside of the windows, but it’s important to remember that the frames, grids, and hardware must be rinsed thoroughly so they don’t streak or leave residue behind.

After rinsing the windows, the cleaner must be dried. It’s best to do this using a squeegee or clean, lint-free towel. If using a squeegee, start at the top and pull down straight across the window, wiping the blade clean after each pass. If drying by hand, use a clean cloth or newspaper sheets.

It’s important to wash and dry windows in a cloudy or shaded area, rather than direct sunlight. Sunlight speeds up the drying process of window cleaning solutions, which can cause streaking or spotting on the windows. It’s also a good idea to work on one window at a time, rather than several windows at once. It’s easier to spot streaks when washing a single window, and it allows you to concentrate on the areas that need more attention. If stains persist, try using a scouring pad or a brush, or make a paste with water and oxalic acid cleaner (such as Zud or Bar Keepers Friend) to scrub the stains.

Cleaning Equipment

Professional and experienced window cleaners invest quite a bit in their cleaning tools and equipment. They generally have a ladder or scaffolding that can reach the windows they are cleaning and several other specialized tools. These tools can range from a basic sponge to a stainless steel scraper.

A squeegee is perhaps the most important tool in any window washer’s kit. This T-shaped tool with a rubber blade clears cleaning solution and dirt from the glass surface, leaving the window streak free. It is essential that this tool be of high quality and regularly maintained. Many manufacturers offer replacement blades for their squeegees.

Another common tool used by professionals is a scrub pad, which can be particularly helpful for cleaning tough build-ups such as bird droppings or insect remains. It is also useful for removing hard-to-reach areas such as corners or windowsills. Some professionals use a grade #0000 stainless steel wool pad to remove more stubborn gunk and debris such as dried paint or cement.

Other specialized tools include a screen cleaner, which is a portable device that attaches to a water hose and consists of a frame that has brushes and running water. Dirty window screens can be inserted into the device and scrubbed, then rinsed clean.

Other tools that are commonly used in the field by professional window cleaners include a sleeve that allows the worker to hold and control a squeegee without using their hands. They may also use a sleeve that can be stuffed with general cotton, lint-free microfiber cloths or abrasive scrubbing pads.

Lastly, most professionals will also carry a set of tools for cleaning stairwells and other difficult-to-reach areas. These may include a broom, a dustpan and a hand-held mop. The broom can be particularly useful for removing loose debris from staircases and landings, while the dustpan can be helpful for collecting small debris and rubbish.

Regardless of the type of window cleaning you perform, it is crucial to have the right tools and supplies at your disposal. This will help you get the job done faster and better while keeping your team safe.

Cleaning Techniques

Professional window cleaners have a variety of cleaning methods they use depending on the size, shape and number of windows. However, one of the best ways to ensure streak-free results is by using a squeegee with a rubber blade. This removes any lingering moisture and prevents the formation of water spots and streaks.

Before you start cleaning your windows, make sure to wipe the frames and grids with a cloth dampened with non-ammoniated all-purpose cleaner and water. Doing this will remove any dirt and grime, which can scratch or damage the glass when you wet-clean the windows. Then, you can start cleaning the actual glass.

To prevent soap scum and water spots, be sure to rinse off all of the chemicals in your cleaning solution before wiping the windows. This step also helps reduce the time it takes for the water to evaporate, which will help avoid streaking and spots.

Next, scrub the windows with a scrubber or sponge that is dampened with the cleaning solution. Be sure to scrub evenly and to rinse the scrubber or sponge frequently. If your windows are especially dirty, you may need to scrub with a stiff bristle brush. Always test any abrasive cleaner or tool on an inconspicuous spot to make sure it won’t scratch the glass.

After scrubbing the windows, rinse them with clean water and a soft squeegee. Be sure to dry them as well. This will ensure that no streaks are left behind, and it will help prevent the buildup of bacteria or the formation of mold on the windows.

When drying the windows, use a clean, lint-free towel or newspaper pages. Avoid rags, as they can leave lint streaks and can even scratch the glass when used incorrectly. You may also want to have a bottle of window cleaner nearby in case the windows are particularly dirty or stained.

For large picture windows, professionals favor a technique called the snake. This method involves starting in one of the upper corners, pulling the squeegee horizontally across the window and then angling it down towards the other corner, where you then pull it vertically over the entire surface of the glass. This method allows you to clean huge picture windows faster than traditional scrubbing and squeegeing.

Cleaning Tips

Before you start cleaning your windows, it’s a good idea to pre-prep the surfaces by dusting them. This will remove any loose dirt and debris that could smear when wet with soapy water. It also gives you a chance to spot any spots that need more attention before they become permanent.

Once the surface is free of debris, you can move on to washing. To avoid letting your cleaner dry on the glass before you can wipe it away, work one section at a time. Start at the top and work your way down, making sure to overlap each stroke with the previous one.

For the best streak-free finish, use a microfiber cloth or chamois to buff your window once it’s clean. This is especially important on window frames and sills, where dirt can hide. You can also try using a rain-repellent treatment such as the 2-in-1 glass cleaner and rain repellent from Rain-X. These products help water beads roll off windows instead of soaking into them, which can cause streaks and dulling.

Rags and paper towels can leave behind lint on your glass as you wipe it. It’s a better idea to invest in a few quality microfiber cloths and a chamois for the job. These items are lint-free and gentle, so they won’t damage your newly cleaned glass. You can also use a lint roller for stubborn or sticky spots.

Before squeegeeing, dampen a microfiber cloth or chamois in clean water to keep the blades of your squeegee from drying out. You should also wipe the edge of the blade with a fresh cloth before beginning each stroke. Press firmly with the handle in your dominant hand and hold the blade of the squeegee at about a 45deg angle to the window. Work the squeegee in an “S” shape, and wipe the blade on the cloth periodically to prevent it from drying out and leaving water on your glass.

When you’re finished, place a towel on the floor in front of the window to catch drips and spills. And don’t forget to clean the screens on your windows before you begin wiping them!

The Importance of Plumbing in Your Home

JG Plumbing is the system of pipes and fixtures that transports water to and from a building. It is important for supplying clean drinking water and removing waste in residential and commercial buildings. Plumbing also includes process piping that transports gases, chemicals, and other liquids during facility manufacturing.

Plumbing

It is recommended that you keep a few basic tools handy for plumbing emergencies. This way, you can make minor repairs yourself and save money.

All of the drain lines in your home that dispense fresh water and remove waste eventually connect to the main sewer line. This crucial line channels the sewage to your local sewage treatment plant or septic system. If this line becomes damaged, then your entire plumbing system will fail to function. Fortunately, you can prevent these problems by getting regular sewer line inspections.

A professional plumber will use a video camera to assess the condition of your pipes. Depending on the size and location of your pipe, it may take up to two hours for the plumber to complete the inspection. In addition, the duration of the sewer inspection depends on the conditions and accessibility of the pipes.

The first step in a video sewer line inspection is to locate the access point. This is usually a clean-out or house sewer trap. A plumber will use a tool to remove the cover and insert the camera into the entry point. The camera will then be moved throughout the pipes, assessing the condition of each section.

A damaged sewer pipe is a serious problem that can cause significant damage to your home and yard. It can also lead to costly repairs and replacements. If you suspect that your sewer line is in need of repair, it’s important to act quickly before the issue escalates.

If you notice signs of a damaged sewer line, such as frequent toilet clogs, water backing up in your basement, or a wet front yard, then it’s time to call for an inspection. A professional plumber will use a video camera and other tools to inspect the condition of your sewer line.

During the sewer pipe inspection, the plumber will pay special attention to critical areas, such as the location of the pipe joints and regions prone to debris accumulation. The plumber will also check for breaks, root intrusions, and other issues that could lead to a failure of the sewage system.

Many homeowners neglect to have their sewer lines inspected until they experience major problems. But by then, it’s too late. A failed sewer line can wreak havoc on your home and cost you thousands of dollars in repairs and cleanup. A video sewer inspection can help you avoid the hassle and expense of a major repair by catching problems in their early stages.

Tree root intrusions

Tree root intrusions are one of the biggest causes of clogged pipes. They occur when a tree’s roots penetrate and grow into plumbing pipes, which can cause serious damage to your sewer system. This can lead to sewage backups and costly repairs. Luckily, there are steps you can take to prevent and treat this problem.

Signs of a root intrusion include slow draining, gurgling sounds from toilets and sinks, and wet spots on your property. If you notice these symptoms, it’s important to contact a plumber right away. They can perform a video inspection of your sewer line to see what the issue is and how best to address it.

Depending on the type of tree, the roots can enter your sewer lines through cracks and joints. They will then seek out water, which they will find in your plumbing pipes. This is why it’s so important to plant trees far from your home. Alternatively, you can also install a barrier to keep the roots from entering your sewer pipes.

There are several ways to remove tree roots from your sewer lines, including hydro jetting and metal cutting. Hydro jetting involves shooting high-pressure water through your pipes to dislodge and break apart clogs. A metal auger or rooter is then fed into the pipe to chop through and remove the intruding roots.

If you’re experiencing recurring clogs and aren’t sure what to do, you may want to consider using rock salt or other chemical root killers. While these might work in the short term, they can also corrode your pipes and harm the environment. It’s important to contact a professional as soon as you notice major blockages so they can inspect your sewer pipes and provide a long-term solution.

Another way to help prevent root intrusion is by avoiding over-watering the soil around your home. This can attract the roots and encourage them to search for water in your plumbing pipes. Instead, you should water your yard less frequently but deeply. This will keep the roots from seeking out hydration in your plumbing pipes and will reduce their chance of penetrating your sewer lines.

DIY kits

Whether you need to replace a toilet flush valve or fix a leaky faucet, putting together a DIY plumbing kit can save you the cost of hiring a professional plumber. With a few basic tools, you can tackle most plumbing tasks on your own. However, if your problem is more serious, it’s best to call a local plumber.

A basic plumbing tool kit should include a pipe wrench, adjustable wrench, a pair of mid-size slip-joint pliers and a multi-bit screwdriver. These tools can help you remove or tighten pipes and fittings easily and quickly. Your local Orcutt hardware store should have a variety of plumbing tools to choose from. You can also get more specialized tools like a drain snake or an auger to clear tougher clogs and break apart obstructed pipes.

You can buy a wide range of plumbing kits at the home improvement store, but you can also build your own from a variety of parts. Some of these are community builds turned into helpful kits that make it easier to do certain plumbing tasks. Some of these kits have tutorial videos and links to additional resources to help you do the job yourself.

The most important item in your plumbing tool kit should be a set of pliers. Choose a pair of tongue-and-groove pliers (also known as water pump pliers or adjustable pliers) for the most versatility. These pliers can twist, hold, pull and grab fittings, nuts, bolts, and more. You should also get a set of Channellock pliers in your plumbing repair kit for the ultimate multi-purpose tool.

Another essential item for your DIY plumbing tool kit is a hacksaw. This saw type is useful for cutting through metal pipes, such as those made of iron and galvanized steel. It’s also useful for cutting bolts and removing seized fasteners. You should also keep a set of extra blades for your hacksaw in your kit.

Finally, you should have a good supply of plumber’s tape and putty. Plumber’s putty is used to create a water-resistant seal in a variety of situations. A small tube of this can save you a lot of money in the long run, so make sure to keep some with your other supplies. Another useful item to have is a caulking gun, which you can use to apply silicone around joints and other areas of your home that require a waterproof seal.

Sewer line repair

When your sewer line is damaged, you need to take care of it as soon as possible. This is because a clogged or broken sewer line can lead to severe damage to your home, including flooding and mold. You can try to fix it yourself, but you will likely need help from a professional.

A professional plumber can use a camera to inspect the condition of your sewer line. They can identify any cracks, holes, or collapsed sections in the pipe and determine whether you need a repair or replacement. If there’s a large break, you may need to replace the entire line. There are a few different ways to do this, but the most effective method is called trenchless sewer line replacement.

This method requires less invasive digging, which reduces the cost of the job. A technician can insert an inflatable tube covered in tough, flexible epoxy resin into the broken section of the pipe. This will seal the hole and repair the leak. If the break is near a junction, a technician can even rebuild the entire section of the pipe by welding a new joint.

If a pipe has been damaged by tree roots, a professional can remove the root and use an in-line drain or “sewer snake” to remove the remaining debris. They can also install a camera to verify the location of the break. A video inspection of the sewer line can reveal any blockages that need to be addressed.

Depending on the type of clog, some homeowners can clear it themselves using a drain snake. Other clogs may be more serious and require a professional. Grease clogs, for example, are often very difficult to clear and can take hours.

If you’re considering hiring a professional to handle your sewer line repair, make sure you get at least three different quotes and check for a license and references. Most local governments require a permit before starting any work on a sewer line, and reputable contractors should know the requirements for your area. It’s also a good idea to get a second opinion from a company that specializes in sewer line inspections and repairs.

The Benefits of Working With an Independent Life Insurance Agent

Independent agents take the time to review coverages with their clients. They can often offer a policy that fits a person’s unique situation.

Insurance

Additionally, they can provide quotes from multiple carriers compared to captive agents who only sell their company’s policies. Working with an independent agent can be a good fit for people who have complicated situations that require special attention. Contact Independent Life Insurance Agent for professional help.

There are so many different insurance options available that it can be hard to know which ones are right for you. Luckily, independent agents are licensed experts that can help you make the best decisions for your situation. They’ll take the time to explain all of the complexities in simple terms so you can understand your options and make informed choices.

Independent agents don’t work for any one company, so they can be more transparent about the pros and cons of each policy they offer. This means that they’ll work with you to find a policy that fits your specific needs instead of trying to sell you a generic product.

In addition, independent agents can often shop around for you to get quotes from multiple companies, saving you a lot of time. Plus, they’ll be able to tell you about any discounts that you might qualify for.

Working with an independent agent can also be a great way to support your local community. Many independent agencies are locally owned and operated, so you’ll be helping a small business in your area. And since they’re local, you can be sure that they’ll be there for you when you need them most.

If you’re looking for expert advice on your life insurance options, an independent agent is the way to go. They’ll be able to provide you with a range of options from top-rated companies and help you choose the right policy for your unique situation. So don’t hesitate — find an independent agent near you today! Then you can rest easy knowing that your family, home, and car are protected. And with a little help from your local independent agent, you can also save money and get the peace of mind that comes with knowing you’re covered.

You’ll Get Local Support

Local independent agents live in the communities they serve and understand the unique risks of those areas. They can help their clients with one-stop shopping for auto, home and renter’s insurance as well as life insurance, ensuring that their clients have all of their needs met. They are also likely highly involved in their community, sponsoring youth sports teams, buying from local businesses and participating in chamber events.

Because independent agents don’t work for a single insurance provider, they can be more transparent about the pros and cons of various policies. This gives them a competitive edge over captive agents who can only offer the products of their employer.

As life changes, so can your insurance needs. An independent agent can help you determine if your current coverages are still right for you, such as after having children or purchasing a new home. In addition, they can also assist with navigating the claims process or changing your policy as your life evolves.

Because independent life insurance agents are licensed, they have a legal responsibility to always put their clients’ interests first. They’ll thoroughly review your individual circumstances and needs and then utilize the wide range of options available to them in order to find the best coverage for you. And they’ll continue to be your advocate even after you choose a policy, helping you with renewals and answering any questions or concerns that may arise. They can even help you file a claim, if necessary. This is why many consumers prefer working with a local independent agent. And it’s a great way to support your local economy!

You’ll Get Insurance That Fits Your Needs

Independent agents aren’t tied to a single insurance company, which allows them to offer more options. This flexibility means that you can find policies that meet your specific needs and budget. Whether you’re looking for life insurance, auto insurance, home insurance or business insurance, an independent agent can help you find the right coverage for your situation.

When you work with an independent agent, they’ll take the time to get to know your unique needs and goals. Then they’ll use their expertise to recommend the best products for your situation. They can also help you understand the terms and conditions of each policy, so you can make an informed decision about your coverage.

In addition, an independent agent can help you combine your policies to save money. And they can update your policies as your circumstances change, such as when you have a new baby or buy a new home. And because they’re local, you can always visit or call them with any questions.

In addition, some independent agents specialize in working with individuals who have complex medical conditions or risky hobbies. These agents can often find life insurance policies for these individuals that are more affordable than those offered by traditional companies. They can also provide advice on obtaining alternative funding sources, such as private disability income protection and long-term care insurance. And if you’re concerned about the high cost of premiums, an independent agent can explore the newest generation of life insurance policies that are designed to keep payments affordable while offering more comprehensive coverage.

You’ll Support a Local Business

Independent insurance agents are part of your community, and they want to see it thrive. They understand the importance of personal connections and work hard to build relationships with their clients. They’re not afraid to try new marketing strategies, either. Whether they’re handing out business cards at a networking event or sponsoring a local tee-ball team, they find ways to connect with their audience.

A local independent agent is your one-stop shop for all of your insurance needs. They can help you choose the right policies for your home, car, and business. They can also provide quotes from multiple companies, so you can get the best coverage for your budget. Plus, if you have any questions or concerns, your agent will be just a phone call away. And when you’re dealing with a crisis, having someone you know and trust by your side is priceless.

In addition to providing expert advice and affordable options, local independent agents can also offer valuable business insights. They can advise on topics like return-to-work programs to get injured employees back to work quickly and cost-effective ways to manage a fleet of company vehicles. And if your independent agent is familiar with other insurance products that may be beneficial to your business, they can often pass along those options as well.

If you’re looking for a way to support your community, a local independent insurance agent is the perfect solution. They’ll help you customize your insurance coverage to fit your unique needs and provide the customer service you deserve. Plus, they’ll give you the peace of mind that comes with knowing you’re supporting a local business. What’s not to love about that?

You’ll Get the Best Rates

Independent agents aren’t tied to a single insurance company like those that work exclusively for a specific company (known as captive agents). This allows independent agents to offer their clients policies from multiple providers. It’s important for life insurance buyers to have access to a wide range of options so they can find the best policy for their needs and budget.

Independent life insurance agents can provide a variety of quotes from different carriers to help you compare not only the premiums, but the coverage and deductibles as well. In addition, independent agents often have special expertise in helping life insurance buyers with complicated situations, including impaired risk applicants who may not qualify for standard policies.

As a result of being able to offer customers a wide selection of policies, independent agents are also able to save them time and money by doing the research for them. This includes checking rates from many different companies, comparing the terms and conditions of each policy, and negotiating with the insurance carrier on their client’s behalf. Independent agents can also assist with the application process and answer any questions that arise along the way.

In addition, independent agents are available year-round to answer questions and provide assistance, even after the policy is in place. This is in stark contrast to the customer service provided by many 1-800 number support centers or online quote comparison services.

Independent insurance agents are licensed professionals who take the time to get to know their clients and understand their needs. They’re able to provide unbiased advice and will work hard to find the right life insurance policy for their clients’ unique needs.

Preparing For Drywall Installation

Drywall construction is a fast way to frame walls in new homes and remodels. It’s much faster than using plaster, which requires mortar.

Drywall Installation

Professionals at Drywall Installation Las Vegas often use a spiral cutout saw to cut openings for outlets, lights and doors and windows. It allows them to transfer the mark of the fixture to the drywall and then simply follow it with the cutter.

Drywall Installation can be heavy work, and a little attention to detail is important for a clean and professional finish. Measuring and planning the layout of drywall can save time and material.

Start by measuring the area to be covered, including any recessed or irregular spaces. This will give you the total square footage, which can be used to estimate how much drywall is needed. If your project involves a ceiling, be sure to measure the height at multiple points to account for any pitch in the space. Once you have the square footage of the wall areas, subtract the square footage of any doors or windows (they will be trimmed later).

To determine the framing needed for a drywall installation, carefully measure the length and width of each wall. Multiply the results by 2 to get the number of studs and plates you will need for each section. This can be done by hand, or with a gypsum board takeoff tool. If you use a gypsum board takeoff software, be sure to use the recommended calculation for a specific product, and always purchase a few extra sheets for waste allowance.

Check for bowed or twisted framing members. A quick visual inspection is usually sufficient, but a straightedge can help if you don’t feel confident in your ability to spot these problems with just a glance. Bowed or twisted framing can weaken the drywall and cause it to warp over time. Depending on how bad the problem is, you may be able to straighten it by re-nailing it or replacing it entirely.

Before installing drywall, it is helpful to run masking tape along the floor and mark the locations of all strapping or joists that will be exposed after the drywall is installed. This will allow you to place screws accurately and avoid the need to remove any that miss their mark. Some drywall products also feature patented installation guide marks that are printed on the surface, such as GridMarX, which helps identify framing for speedy screw placement.

For each sheet of drywall that you need to cut around fixtures, such as electrical boxes and plumbing, draw a line on the backside with a pencil using the measurement you took for the layout of the room. Then, score the drywall with a utility knife, using the straight edge as a guide. When you score the drywall, don’t push completely through the paper, but enough to cut through it and expose the core.

Determine the Framing

Before you hang the first sheet of drywall, it’s important to determine the framing spacing. That means you have to measure the distance between the centers of adjacent studs, typically 16 inches on-center. This helps you calculate how long to cut each gypsum board. It also helps you mark receptacles, such as electrical outlets, on the wall and on the drywall. You’ll then have to cut around those receptacles when you fasten the boards.

To make this calculation, you’ll want to start with a set of construction plans, or at least a rough sketch of the wall. You can then create a layout that shows the dimensions of the walls, as well as any door and window openings. Once you’ve determined the spacing, you can begin cutting your drywall sheets.

Drywall installers need to be flexible and adaptable when it comes to the framing on a project, because it isn’t always constructed as planned. Occasionally, contractors run out of lumber or the builders may change plans. This is why it’s vital to have a good communication system with your team so everyone understands the situation and knows what to do.

Another common challenge when installing drywall is that of second-story rooms. These spaces are often not wide enough to fit the drywall through the staircase, and that requires special handling techniques. Usually, the pros will lift the drywall on to the staircase and use a crane to lower it into place.

Once the drywall is in place, you can install the fixtures and trim. Then, when you need to remove a panel to access an outlet or switch, you can simply use a keyhole saw to cut through the drywall and into the core of the board.

When hanging drywall, it’s important to use the right type of screws. You’ll want to use bugle head screws that are specially designed for attaching drywall to wood or metal framing. The right screw will help ensure a tight, secure bond. It will also keep the drywall from pulling away from the framing when it’s subjected to stress. In addition to using the correct screw, you should also apply joint compound to the seams and allow it to dry according to the suggested time on the product’s label.

Cut the Sheets

Drywall is a simple and affordable building material that can transform your home. It comes in large sheets that must be cut to size before hanging. The more precise you are in your measurements and placement, the easier it is to finish with tape and mud.

As a rule of thumb, hang horizontal surfaces like ceilings and soffit bottoms first, then work on the walls. This makes it easier to handle the heavier, more cumbersome drywall sheets. If your project requires you to cut openings for doors and windows, do this work before you mount the drywall sheets, as protruding jambs and insulation can interfere with the process. For the most accuracy, use a power saw instead of a handsaw when making these cuts.

To start your drywall installation, position the first sheet so that it’s perpendicular to the framing components and one end is flush against a wall or ceiling. Using a lift or an assistant, secure the board to the ceiling or wall by driving screws in a line across its center and into each joist at a convenient height.

Before continuing, make sure the initial board fits correctly by examining its edges for breaks and dents. If you find a gap, reposition the board to eliminate the crack or divot. If the drywall is too long, cut it so that it’s about an inch shorter than the opening you’re covering.

When you’re ready to hang the next drywall sheet, position it tight against the ceiling or wall and drive a row of screws in at a convenient location. Screws should be spaced about 16 inches apart and set into the studs.

Repeat this process until you’ve hung all the walls and ceilings. If you’re working alone, consider renting a drywall lift or finding a friend to help. Hanging drywall is heavy, and it’s easy to mismeasure or make mistakes that are difficult to correct.

As you’re putting in the screws, be sure to listen for a click — that sound indicates you’ve hit and broken one of the rogue fasteners, which will require more laborious fixing later. When you’ve finished, drag a putty knife over every single screw and nail head to ensure the drywall will hold well and smooth it out.

Hang the Sheets

Drywall installation is heavy work, so it’s a good idea to have an assistant. Renting a lift or getting a friend to help is a smart move. If you’re working alone, take your time and be careful. A little attention to detail now will save you a lot of corrective work later.

Start with the first drywall sheet and position it so that one edge sits flush against the ceiling board. It should be about a quarter-inch shorter than the wall’s measurement to make it easier to cut and nail. Use a utility knife to score the front side of the sheet, using a T-square or other straightedge as your guide. Apply pressure to snap the sheet along your scored line.

When you’re ready to hang a new drywall sheet, be sure to check for stray nails, screws or other fasteners that will interfere with the installation. Also, look for electrical, plumbing or other lines that may be in the way. If you find any, mark them so that you can avoid drilling or nailing into them.

Next, position the drywall panel against the wall and drive drywall screws into it. Make sure that the screws are set slightly below the surface of the paper, rather than in the gypsum core. After each row is complete, drag a putty knife over every screw to be sure that it has been set. It’s a common mistake to skip this step, and it can result in broken screws that are difficult to set with a hammer.

For outside corners, use a metal corner bead to protect them. It’s easy to install, but you need to be careful not to cut it too short, as this will kink it when it’s fastened.

To install a metal bead, simply measure the length of the panel and add six inches. Then, use tin snips to cut it to size. Once it’s in place, tack it into the corner with nails spaced about every nine inches. Repeat this process for each inside and outside corner of the room.

Preventative Measures to Prevent Air Conditioning Repair

Air conditioning is a crucial part of creating a comfortable home environment. By removing excess humidity and circulating filtered air, it can reduce the risk of respiratory problems and allergies.

ac repair

If you notice any issues with your air conditioner, it’s time to call for a repair. A qualified service tech will inspect your system, check your refrigerant levels and verify that the ducts are properly sized. For professional help, contact Air Conditioning Repair Loveland OH.

The evaporator coil in your air conditioner is responsible for absorbing heat from the air in your home. When this coil becomes dirty, the air conditioner is unable to properly cool your home and may even damage your system. A dirty coil is one of the most common problems homeowners face with their AC units. A few simple preventative measures can help keep this part of your system clean, preventing many air conditioning repair issues in the future.

Dirty evaporator coils often become dirty as a result of air pollution in the house and lack of regular maintenance. When air filters are not changed frequently, dust and other contaminants can collect on the evaporator coil, reducing its efficiency. If there is no air filter, this problem is worse, as the contaminants will be allowed to directly contact the evaporator coil. This can lead to ice formation on the coil, restricted air flow, and increased energy consumption.

Another sign of a dirty evaporator coil is the inability to reach your desired temperature setting on your thermostat. This happens when the evaporator coil is unable to absorb heat from the air, which results in your air conditioning running longer to cool your home. Over time, this can cause your air conditioner to overwork itself and reduce its lifespan.

A dirty evaporator coil can also restrict the refrigerant’s ability to transfer heat, which can lead to a freeze up on the coil. This can then limit airflow and create a vicious cycle as the coil ices up and restricts airflow, creating more icing. This is why it is so important to regularly inspect your evaporator coil and remove any debris that is present.

If you notice that your evaporator coil is dirty, it’s important to call an air conditioning professional. They will know how to safely access the coil and ensure that it is cleaned correctly without damaging other parts of your air conditioning unit. They will also be able to identify any signs of mold or other potential problems with the coil and address them accordingly.

Dirty Compressor Coils

The air conditioner’s compressor unit is located outside, so it must be protected from debris that could damage the coil fins and other components. Nevertheless, the coils will inevitably come into contact with dust, dirt and other pollutants in the surrounding environment. This is why regular coil cleaning services are so important.

Dirty condenser coils cause your system to work harder and longer to maintain cooling efficiency. The buildup reduces the coil’s ability to absorb or dump heat, forcing the compressor to run longer to achieve the same results. This increased stress can lead to premature wear and tear on the system, putting it at risk of breaking down in the future.

When the coils become too coated with dust, they can no longer convert hot refrigerant gas back into a liquid. This causes the compressor to overheat, leading to a breakdown of the entire air conditioning unit.

As the cooling process continues, your condensate drain line may become clogged with water and dirt. Unless it is cleaned, this can lead to the overflow of the air conditioner, flooding your home with water and other debris.

You’ll also notice a drop in your air conditioner’s cooling capacity as the coils begin to lose their luster and function more slowly. The reduced performance of the air conditioner is a sure sign that it’s time to call an AC technician for a coil cleaning and inspection service.

Dirty coils reduce your air conditioning system’s efficiency, resulting in higher energy bills during Florida’s scorching summers. It is important to keep the evaporator and condenser coils clean to avoid high energy bills, decreased indoor comfort and potential system failure. A professional air conditioning technician can perform a routine coil cleaning and inspection to remove any accumulated dirt, debris or dust. In addition, they can ensure the system’s drain lines are clear of clogs and straighten bent coil fins to improve airflow and cooling efficiency. To get started, schedule an air conditioning inspection today. It’s easy with our online scheduling tool! Just click the orange “Schedule Now” button below to see available times at your neighborhood Jiffy Lube.

Low Coolant Levels

Refrigerant (also known as Freon) is a key component of any air conditioning system. It is what absorbs heat from the air and causes it to cool down. When there is not enough refrigerant in the system, it will affect how well your AC works and can lead to serious damage if left unchecked. There are several signs that your AC may be low on refrigerant.

One is when you notice ice on the evaporator coil or in the refrigerant lines. Another is if you notice that the air coming out of your vents feels warmer than usual. This is because there is not enough refrigerant to absorb the heat from the air and lower its temperature. If you hear hissing or bubbling noises, it is also a sign that your refrigerant levels are low and you should call an HVAC technician right away.

The most common cause of low refrigerant is a leak in the system. Over time, the seals that hold the refrigerant in place can deteriorate, leading to leaks. These leaks will allow the refrigerant to escape the system, which can result in lower cooling performance and higher energy bills.

Another reason for low refrigerant is contamination. Moisture, dirt and other foreign substances can get into the refrigerant lines and degrade it. Regular maintenance, proper handling and storage of the refrigerant can help prevent this.

In addition, low refrigerant is a sign that there are other problems in the system that need to be addressed. Leaks, corrosion and other issues can all be resolved with air conditioning repair before they worsen.

Adding more refrigerant to your system can be tempting, but this is not a long-term solution and will likely only mask the problem. You will need to have the system inspected and repaired by a professional before adding any more refrigerant. They can also recommend other maintenance and inspection services to help keep your air conditioner running properly. Contact our experts today for more information or to schedule your next service! We’re ready to help you live comfortably again.

Dirty Filters

Dirty filters are one of the most common issues affecting your air conditioning system’s performance. Every filter will get dirty over time, but there are some situations that cause them to clog more quickly than others. These dirty filters may lead to efficiency and performance problems in your AC unit that could require air conditioning repair services.

The primary function of an air filter is to trap airborne contaminants like dust, dander and other allergens so that they don’t recirculate throughout your building’s ductwork system and into the spaces you inhabit. This is important for your home or office’s indoor air quality, particularly if anyone in your space suffers from respiratory issues or allergies. The bad news is that dirty filters also allow those same airborne contaminants to enter your air conditioner and circulate back out into the indoor space.

Air filters typically get dirty when they are not replaced frequently enough. This happens because the filter has gaps that allow airborne pollutants to slip through. As time goes on, these contaminants build up on the surface of your air filter until it gets clogged with particles.

As a general rule, your air filter should be changed monthly. For best results, your air filter should be changed more frequently if you have pets or live in a dusty area.

When your air filter is too dirty, it will prevent air from flowing through the cooling coils in your system. This can make your air conditioner overheat. If this occurs, you will need to shut off your AC and clean or replace the filter.

The most noticeable sign that your air filter is too dirty is when your HVAC system fails to cool the building to a comfortable temperature. It will produce hot and cold spots or never reach the temperature that you have set on the thermostat.

A dirty air filter will also cause an increase in your energy bill. This is because your air conditioner has to work harder to keep the space comfortable, which requires more energy. Over time, the added stress can wear on the components of your system, causing them to break down or overheat.