Drywall construction is a fast way to frame walls in new homes and remodels. It’s much faster than using plaster, which requires mortar.
Professionals at Drywall Installation Las Vegas often use a spiral cutout saw to cut openings for outlets, lights and doors and windows. It allows them to transfer the mark of the fixture to the drywall and then simply follow it with the cutter.
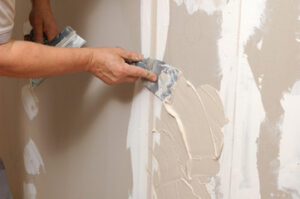
Drywall Installation can be heavy work, and a little attention to detail is important for a clean and professional finish. Measuring and planning the layout of drywall can save time and material.
Start by measuring the area to be covered, including any recessed or irregular spaces. This will give you the total square footage, which can be used to estimate how much drywall is needed. If your project involves a ceiling, be sure to measure the height at multiple points to account for any pitch in the space. Once you have the square footage of the wall areas, subtract the square footage of any doors or windows (they will be trimmed later).
To determine the framing needed for a drywall installation, carefully measure the length and width of each wall. Multiply the results by 2 to get the number of studs and plates you will need for each section. This can be done by hand, or with a gypsum board takeoff tool. If you use a gypsum board takeoff software, be sure to use the recommended calculation for a specific product, and always purchase a few extra sheets for waste allowance.
Check for bowed or twisted framing members. A quick visual inspection is usually sufficient, but a straightedge can help if you don’t feel confident in your ability to spot these problems with just a glance. Bowed or twisted framing can weaken the drywall and cause it to warp over time. Depending on how bad the problem is, you may be able to straighten it by re-nailing it or replacing it entirely.
Before installing drywall, it is helpful to run masking tape along the floor and mark the locations of all strapping or joists that will be exposed after the drywall is installed. This will allow you to place screws accurately and avoid the need to remove any that miss their mark. Some drywall products also feature patented installation guide marks that are printed on the surface, such as GridMarX, which helps identify framing for speedy screw placement.
For each sheet of drywall that you need to cut around fixtures, such as electrical boxes and plumbing, draw a line on the backside with a pencil using the measurement you took for the layout of the room. Then, score the drywall with a utility knife, using the straight edge as a guide. When you score the drywall, don’t push completely through the paper, but enough to cut through it and expose the core.
Determine the Framing
Before you hang the first sheet of drywall, it’s important to determine the framing spacing. That means you have to measure the distance between the centers of adjacent studs, typically 16 inches on-center. This helps you calculate how long to cut each gypsum board. It also helps you mark receptacles, such as electrical outlets, on the wall and on the drywall. You’ll then have to cut around those receptacles when you fasten the boards.
To make this calculation, you’ll want to start with a set of construction plans, or at least a rough sketch of the wall. You can then create a layout that shows the dimensions of the walls, as well as any door and window openings. Once you’ve determined the spacing, you can begin cutting your drywall sheets.
Drywall installers need to be flexible and adaptable when it comes to the framing on a project, because it isn’t always constructed as planned. Occasionally, contractors run out of lumber or the builders may change plans. This is why it’s vital to have a good communication system with your team so everyone understands the situation and knows what to do.
Another common challenge when installing drywall is that of second-story rooms. These spaces are often not wide enough to fit the drywall through the staircase, and that requires special handling techniques. Usually, the pros will lift the drywall on to the staircase and use a crane to lower it into place.
Once the drywall is in place, you can install the fixtures and trim. Then, when you need to remove a panel to access an outlet or switch, you can simply use a keyhole saw to cut through the drywall and into the core of the board.
When hanging drywall, it’s important to use the right type of screws. You’ll want to use bugle head screws that are specially designed for attaching drywall to wood or metal framing. The right screw will help ensure a tight, secure bond. It will also keep the drywall from pulling away from the framing when it’s subjected to stress. In addition to using the correct screw, you should also apply joint compound to the seams and allow it to dry according to the suggested time on the product’s label.
Cut the Sheets
Drywall is a simple and affordable building material that can transform your home. It comes in large sheets that must be cut to size before hanging. The more precise you are in your measurements and placement, the easier it is to finish with tape and mud.
As a rule of thumb, hang horizontal surfaces like ceilings and soffit bottoms first, then work on the walls. This makes it easier to handle the heavier, more cumbersome drywall sheets. If your project requires you to cut openings for doors and windows, do this work before you mount the drywall sheets, as protruding jambs and insulation can interfere with the process. For the most accuracy, use a power saw instead of a handsaw when making these cuts.
To start your drywall installation, position the first sheet so that it’s perpendicular to the framing components and one end is flush against a wall or ceiling. Using a lift or an assistant, secure the board to the ceiling or wall by driving screws in a line across its center and into each joist at a convenient height.
Before continuing, make sure the initial board fits correctly by examining its edges for breaks and dents. If you find a gap, reposition the board to eliminate the crack or divot. If the drywall is too long, cut it so that it’s about an inch shorter than the opening you’re covering.
When you’re ready to hang the next drywall sheet, position it tight against the ceiling or wall and drive a row of screws in at a convenient location. Screws should be spaced about 16 inches apart and set into the studs.
Repeat this process until you’ve hung all the walls and ceilings. If you’re working alone, consider renting a drywall lift or finding a friend to help. Hanging drywall is heavy, and it’s easy to mismeasure or make mistakes that are difficult to correct.
As you’re putting in the screws, be sure to listen for a click — that sound indicates you’ve hit and broken one of the rogue fasteners, which will require more laborious fixing later. When you’ve finished, drag a putty knife over every single screw and nail head to ensure the drywall will hold well and smooth it out.
Hang the Sheets
Drywall installation is heavy work, so it’s a good idea to have an assistant. Renting a lift or getting a friend to help is a smart move. If you’re working alone, take your time and be careful. A little attention to detail now will save you a lot of corrective work later.
Start with the first drywall sheet and position it so that one edge sits flush against the ceiling board. It should be about a quarter-inch shorter than the wall’s measurement to make it easier to cut and nail. Use a utility knife to score the front side of the sheet, using a T-square or other straightedge as your guide. Apply pressure to snap the sheet along your scored line.
When you’re ready to hang a new drywall sheet, be sure to check for stray nails, screws or other fasteners that will interfere with the installation. Also, look for electrical, plumbing or other lines that may be in the way. If you find any, mark them so that you can avoid drilling or nailing into them.
Next, position the drywall panel against the wall and drive drywall screws into it. Make sure that the screws are set slightly below the surface of the paper, rather than in the gypsum core. After each row is complete, drag a putty knife over every screw to be sure that it has been set. It’s a common mistake to skip this step, and it can result in broken screws that are difficult to set with a hammer.
For outside corners, use a metal corner bead to protect them. It’s easy to install, but you need to be careful not to cut it too short, as this will kink it when it’s fastened.
To install a metal bead, simply measure the length of the panel and add six inches. Then, use tin snips to cut it to size. Once it’s in place, tack it into the corner with nails spaced about every nine inches. Repeat this process for each inside and outside corner of the room.